
tl;dr: Shim source is here and a fully working example is here. And there is a video walkthrough that you can watch here:
Introduction
Streamdal offers an open-source shim for the popular KafkaJS library that allows any application that uses KafkaJS to add sophisticated data pipelines with as little as a few configuration parameters. The shim automatically maps your Kafka-related services such that you can visually create pipelines and attach them to any Kafka operation in seconds. The pipelines are executed in your application code so your data can be transformed inline without being sent to an external platform.
Background
At Streamdal we’re on a mission to democratize real-time data pipelines. To that end, we’ve built a lightweight open-source platform with a variety of language SDKs and shims to bring this powerful functionality to the widest possible audience.
Getting Started
Let’s assume you already have a Node Typescript or Javascript application that leverages KafkaJs, if not feel free to clone our example repo here so you can follow along. The example we’ll be using for this walkthrough is under kafka/kafkjs-shim.
This:
"dependencies": {
  "kafkajs": "^2.2.4"
}
Becomes this:
"dependencies": {
  "@streamdal/kafkajs": "^2.2.6"
}
Run npm install to install the updated dependency.
It’s important to note that if you run your app now without making any other changes, it will run exactly as before. The Streamdal shim is unobtrusive and will not add any additional behavior unless you configure it to do so.
Turn It On
There are a few ways to enable Streamdal’s data pipeline functionality. The quickest is to add environment variables. If your Node application supports .env files, simply add these three environment variables to your .env file:
STREAMDAL_URL="localhost:8082"
STREAMDAL_TOKEN="1234"
STREAMDAL_SERVICE_NAME="localhost"
Alternatively, you can simply export these environment variables in the shell where you run your Node application, or you can configure Streamdal entirely via code. See the commented streamdalConfigs code.
You’ll need to set the env vars above to reference the Streamdal platform running in your environment. If you don’t have Streamdal installed you can follow the quickstart guide. Or if are using kafkjs-shim example, simply run docker compose up and that will bring up everything you need, including Kafka and the Streamdal platform_
Fire up your app as normal and it will register with your Streamdal instance. Streamdal will automatically map your Kafka operations. If you are using the kafkjs-shim example, run npm start.
Head on over to the Streamdal Console to see an interactive map of your Kafka-related operations. For the kafkjs-shim example, we’ll open http://localhost:8080.
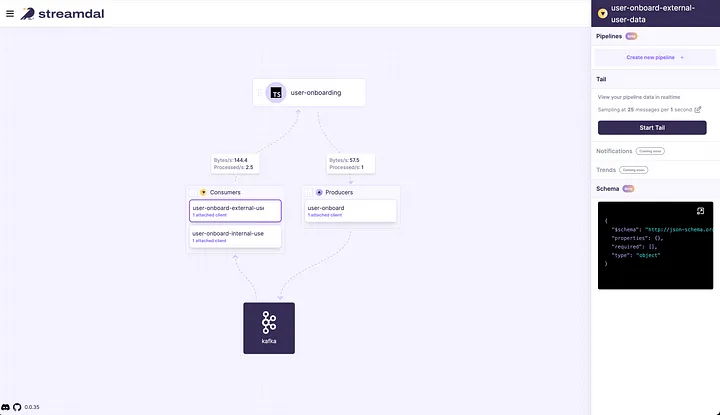
You’ll see all of your Kafka operations represented along with some useful metrics about activity on each operation. You can click Start Tail to take a real-time peek at the data flowing through any given operation:
Note that data is sampled and sent to your Streamdal instance only when you invoke a Tail operation. Data does not leave your application for the purpose of running pipelines. Streamdal ships pipelines to your application and executes them inline using WASM!
Add A Pipeline
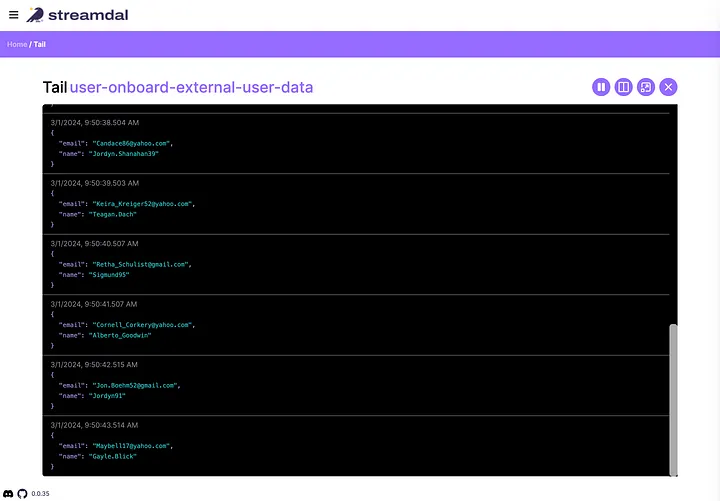
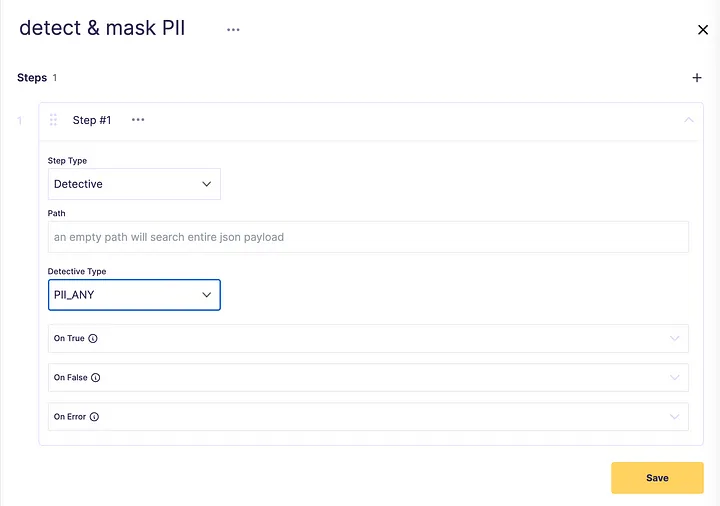
You can see from the screenshot above that some minimum user registration information is flowing through our Kafka consumers and producers. Let’s click on the user-onboard-external-user-data operation and then select Create new pipeline in the right-side info drawer. We’ll name the pipeline and add a Detective with an empty path and a type of PII ANY. This step will locate any kind of Personally Identifiable Information anywhere in the operation’s payload.
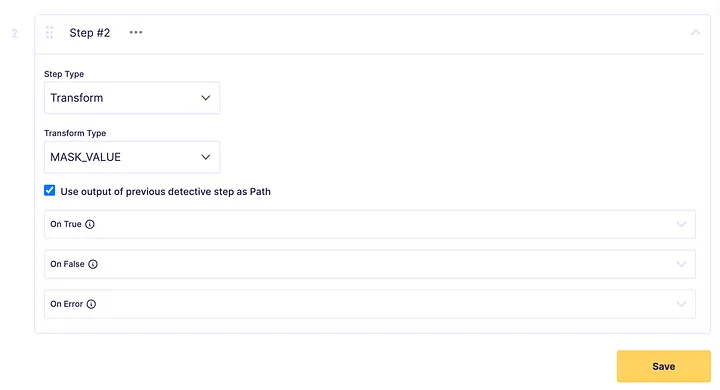
Next let’s add another step to mask the PII we’ve found in the previous step. Set the step type to Transform, the transform type to Mask, and then choose Use output of the previous detective step as the path.
Save the pipeline and then attach it to our user-onboard-external-user-data operation by checking the attach option in the side drawer. Next, click Start Tail in the side drawer and we’ll see how the data flowing through this operation looks now:
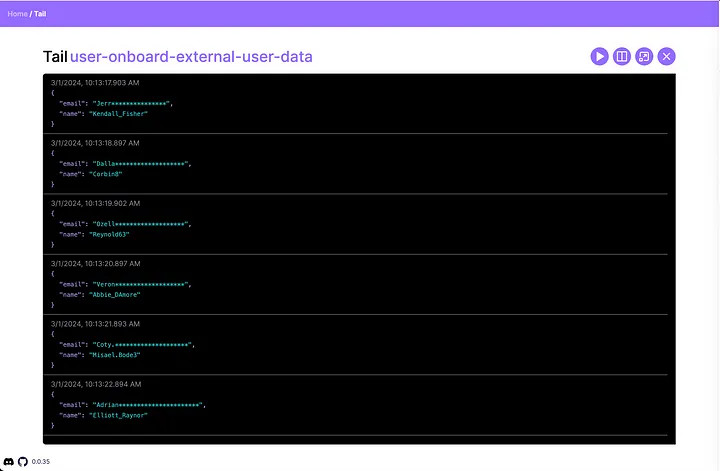
Voila, you can see that Streamdal has shipped the attached pipeline to our application and the shim begins executing it immediately! Now any code downstream of this consumer pipeline will receive the transformed data. In this case, it will no longer contain PII.
Conclusion
That’s just the tip of the iceberg of the sorts of pipelines you can configure and use with the Streamdal platform. Click around the pipeline creation screen and you’ll see a large variety of pre-loaded Detective and Transformer types as well as automatic schema inference, schema change detection, arbitrary HTTP requests, and Key/Value lookups.

Want to nerd out with me and other misfits about your experiences with monorepos, deep-tech, or anything engineering-related?
Join our Discord, we’d love to have you!